The Invoice Page
 Once you have enabled the Invoice Page facility in My Preferences, the Inspection Detail screen will display an additional tab, as shown. There will also be a new tab in the My Profile page that will require the input of your ABN, EFT details and other invoice specific information.
The new Invoice Page pemits the entry of one or more line items to be presented on an invoice that can printed out and included with the Form26 and optional Cover Page.
There are two fields that identify the description of the service and the price – and a checkbox that indicates whether GST is included in that price. Most services will attract the GST, however the certificate itself, does not (as we are given to understand!).
There is also a checkbox to indicate whether the invoiced item has been paid, so that you can reprint the invoice (with a zero or partial balance) once a payment is received.
Once you have created a line item and updated the invoice, you can continue to add items until the invoice is complete.
The invoice itself is printed with the same header and footer specified in the Report, so if you are intending to use the invoicing facility and have yet to setup the report header and footer – now is the time to do it. Head to Report tab in My Profile. Let us know if you need help with this.
Here is an example of sorts.
Inspections appear “gone”
In a small number of cases, the first visit to the new release of the form26.com.au application, has resulted in the My Inspections screen not displaying the inspections properly.
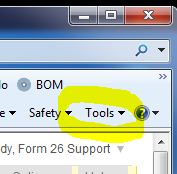
The resolution appears to be to empty the browser’s temporary internet files (or cache). In Internet Explorer, this is achieved by clicking on Tools, and selecting Internet Options from the list.

In the window that is then displayed, select Delete in the Browsing History section,

and then select Temporary Internet Files and click Delete.

If this proves unsucessful, please contact us, so that we can help further.
The Cover Page
Once you have enabled the Cover Page facility in My Preferences, the Inspection Detail screen will display an additional tab, as shown. Another tab will also appear in the My Preferences screen, that will alow you to specify defaults for the Cover Page.
The new Cover Page tab in the Inspection Detail screen permits the entry of three text areas, all of which are optional and the inclusion (upload) of a photograph and map of the location.
Comments
The Comments area is for your notes specific to this inspection. You can fill them in each time, tailored specifically to the recipient or, if you have a set of “stock” comments for particular client types (e.g. owners, body corporates, real estate agents, etc.), you can set these up in the My Preferences screen and pull them in to the inspection, as required.
Summary
The Summary area is designed to be used for your standard Inspection text that will be used on all cover pages (e.g. “I have inspected the above property and found …”, etc.). You can set up a template for this area in My Preferences or use the default built in. Simply untick the box to prevent display of this area.
Note
The Note area is just another optional text area that behaves the same way as the Summary text, where you can set up another block of standard text (e.g. instructions about who must reinspect the property and when it must be done by). Again, you can set up a template for this area in My Preferences or use the default built in. Simply untick the box to prevent display of this area.
Cover Page Images
The Cover Page Images section provides the capability to include an image of the property (or the pool) on the Cover Page and generate a Google Map of the property location.
If the image uploaded has GPS data embedded, the map will will be generated automatically. If not, then you can Generate Map, which will attempt to create a map based on the address provided in the inspection. The Generate Map facility allows a number of “zoom” levels that can be adjusted to deliver the required result.
Here is an example of the printed result. Give it a try!
The cover page itself is printed with the same header and footer specified in the Report, so if you are intending to use the cover page facility and have yet to setup the report header and footer – now is the time to do it. Head to Report tab in My Profile.
Emailing the Form26 (iPhone/iPad)
 Of course, “There’s an App for that” …
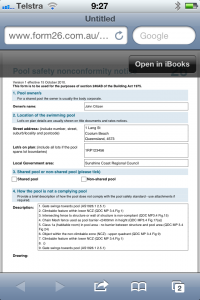
If you need to email the finished Form26 Report direct from the iPhone or iPad, you will need to install a free app, from Apple, called iBooks.
When the Form26 PDF is displayed in the browser, you will get an option to Open in iBooks, which will then provide an option to email it from the device.
Enjoy.
Annotating Photos
Now that we have a way of uploading photographs in to the Rectification area of the Form26, the subject of how to draw on your photographs is likley to become a more interesting topic. Whilst we are unable to offer any specific guidance, this post will hopefully provide those interested with somewhere to begin.
Here are some of the packages that will allow you to draw arrows, circle things and overlay text on to your photos. Obviously, the photos have to be on your computer for most of these options.
- PowerPoint – this is part of the Microsoft Office suite and quite common. You can start a new presentation and insert your image in to a slide. Use the tools it provides to annotate it (and there are plenty), then Save As a JPEG file. It looks to me like you would then need to crop the white space from the result, as it creates an A4 sized slide (with your photo in the middle) but there are many options that you may be able to use to avoid having to do this. If not, refer to the cropping discussion in the Scanning Your Signature post.
- Paint – this is another image program tha ships with many computers, usually found in the Programs-> Accessories folder and the version that comes with Windows 7 is quite powerful. This manipulates the image directly, so make sure you save it as something else (another name), so you don’t ruin your original.
- Snipping Tool – this is a new little app that comes with Windows 7. Whatever is on the screen can be captured in this tool and then drawn on with a pencil or highlighter, then saved as a JPEG. The drawing options are not very broad and you can’t overlay text – but it’s super quick, free and easy.
- iPhone App – there are many iPhone (and presumably iPad) apps that will let you take a photo and draw all over it and save it as another photo, which you can then download to your computer for subsequent upload to Form26.com.au. The one I’ve played with is DrawCast – check it out!
NB: It is recognised that IOS4 and below do not provide a way to pull photos direct from the iPhone or iPad in to a websites upload facility (that’s ANY website, not just ours!) – there’s a new IOS coming … fingers crossed?
Beyond these, we get in to purpose-specific graphics programs like Photoshop and Corel Draw … good luck with those …
Let us know your method in the Comments!
Scanning your signature
Getting your signature uploaded for use in the generated Form 26 is easy – it’s done from the My Profile section.
Producing the image in the first place, requires the following steps: –
- sign your name on a clean, white sheet of paper;
- scan it (or get it scanned);
- trim it;
- then upload it.
The trimming (or cropping) step is really the only possible hurdle in the process – and finding a tool that will do it for you. Here is a list or programs that you may already have: –
- Microsoft Office Picture Manager – if you have Office, you have this (in the tools folder).
- Windows Photo Gallery – ships with Vista.
- Windows Live Photo Gallery – comes with many Windows 7 computers as part of the Windows Live suite of programs and is downloadable from the net, if not already installed.
Crop all the white space from around the signature and then save the file (as .jpg) and then upload it.
If you are having issues getting cropped, just drop us a note on the help page and we’ll get it sorted for you.
Saving the Form 26
When you click Print in the inspection, a new browser window opens and the completed Form 26 is displayed.
 What happens then depends on what sort of browser you are using and what version of Adobe Acrobat Reader your computer has.
Often there is a ribbon across the top of the page which is an Acrobat toolbar of sorts, which will contain buttons to allow you to save the PDF on to your computer.
This toolbar seems to have disappeared in the latest version of the Acrobat software (Reader X), although you can get it back by waving your mouse towards the bottom of the page, in the middle – and a smaller version of the toolbar will appear.
The easiest way to save it, however, is to click Page in the Internet Explorer toolbar and select Save As …
As always, if you are having problems, drop us a note.


